
A beautiful paver walkway can boost your home’s curb appeal and guide guests through a stunning garden entrance, but one wrong move during installation can turn that dream into a rippling, sunken mess within a single season. Across the country, homeowners are discovering the hard way that concrete paver walkway mistakes are far more common — and far more costly — than most DIY guides let on. From improper excavation depth to skipping edge restraints, these errors don’t just look bad; they create tripping hazards, water pooling, and structural failures that require complete tear-outs.
In this comprehensive guide, we’re breaking down the ten most ruinous concrete paver walkway mistakes that cause uneven, sunken paths, and exactly how to avoid them so your hardscaping investment lasts for decades instead of months.
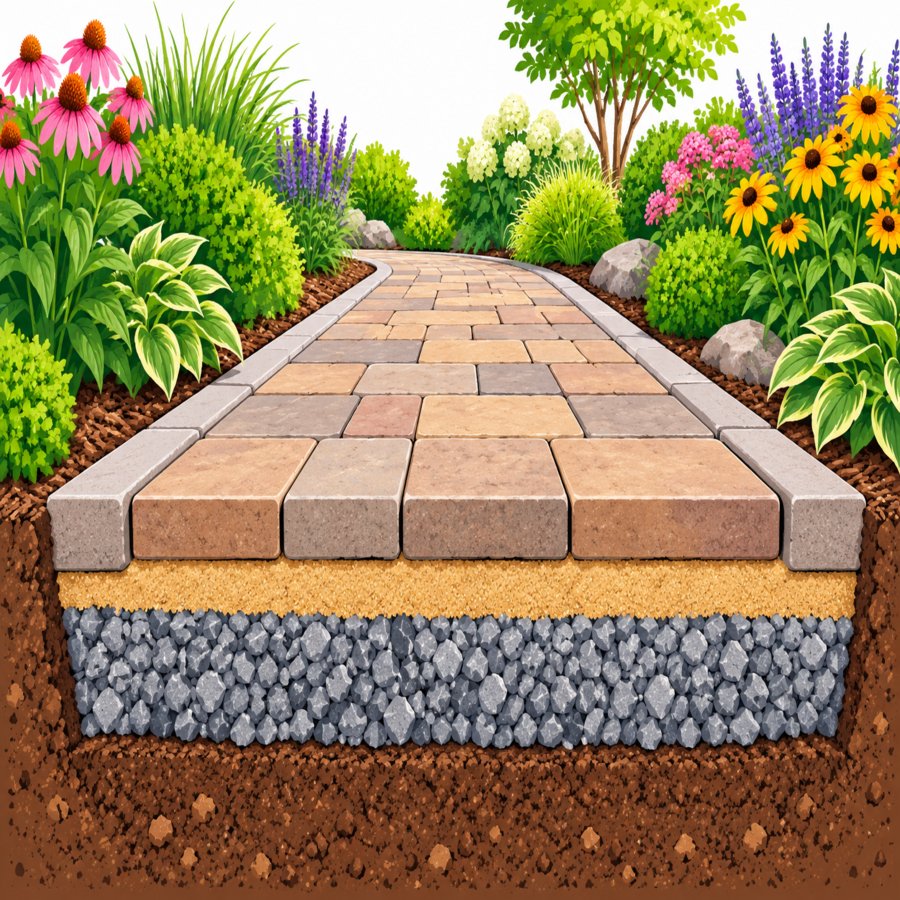
Why Concrete Paver Walkway Mistakes Happen So Often
Pavers look deceptively simple to install, which is exactly why so many homeowners rush the process. Unlike poured concrete, pavers rely entirely on the layers beneath them for strength and stability.
If those foundational layers aren’t built correctly, no amount of careful paver placement on top will prevent shifting, sinking, or cracking. Most concrete paver walkway mistakes actually happen before a single paver is even laid, buried deep in the excavation and base-building stages where problems are invisible until it’s too late.
Understanding this upfront changes how you approach the entire project, shifting your focus from aesthetics to engineering fundamentals.
Mistake 1: Skipping Proper Excavation Depth
One of the most frequent errors is digging too shallow a base, leaving insufficient room for the gravel, sand, and paver layers. A walkway needs at least 6 to 8 inches of excavated depth for pedestrian paths, and more for driveways.
Why this matters: Shallow excavation forces installers to skimp on base material, which directly leads to an uneven garden path within the first year as the ground settles unevenly beneath the thin foundation.
Always measure twice and dig according to your specific soil type, since clay-heavy soils often require deeper excavation than sandy, well-draining ground.
Mistake 2: Neglecting Paver Base Compaction
This is arguably the single biggest contributor to sunken, wavy walkways. Poor paver base compaction leaves air pockets and loose gravel beneath the surface, and those gaps eventually collapse under foot traffic and rainwater pressure.
Professional installers compact the base material in thin layers — typically 2-inch lifts — using a plate compactor, rather than dumping all the gravel at once and compacting the top only.
The fix: Rent a reliable plate compactor, work in layers, and test firmness by walking across the base; if you leave footprints, it needs more compaction. Proper paver base compaction is non-negotiable for long-term stability.
Mistake 3: Choosing the Wrong Base Material
Not all gravel is created equal. Many DIYers mistakenly use pea gravel or river rock as a base layer, assuming any rock will do.
These rounded stones don’t lock together the way angular crushed stone does, meaning they shift and roll under pressure instead of forming a stable, compacted foundation.
Best practice: Use crushed angular gravel, often labeled as road base or Class II base material, which interlocks tightly when compacted and resists lateral movement over time.
Mistake 4: Ignoring Proper Drainage Slope
Water is the silent destroyer of every walkway. Without a slight slope — generally a 1 to 2 percent grade away from your home’s foundation — water pools on the surface and seeps down into the base layers.
Over time, this trapped moisture erodes compacted gravel, causes freeze-thaw heaving in colder climates, and softens the soil beneath, producing a frustratingly uneven garden path riddled with low spots and puddles.
Use a level and string line throughout installation to confirm consistent drainage slope before setting a single paver.
Mistake 5: Forgetting Edge Restraints
Pavers rely on lateral confinement to stay locked in place. Without rigid plastic, metal, or concrete edge restraints along both sides of the walkway, pavers gradually spread apart under foot traffic.
This spreading creates widening gaps, shifting rows, and eventually a wobbly, unstable surface that no amount of polymeric sand can fix on its own.
Install restraints staked firmly into the compacted base before laying your bedding sand layer, and never treat them as optional for anything beyond a purely decorative stepping-stone path.
Mistake 6: Making Costly Polymeric Sand Errors
Polymeric sand locks pavers together and prevents weed growth, but common polymeric sand errors ruin its effectiveness almost immediately. Applying it to wet pavers, failing to sweep away excess residue, or not compacting it properly into the joints are the top culprits.
When moisture activates the polymer binder on the paver surface instead of inside the joints, it creates an unsightly haze or film that’s nearly impossible to remove without professional cleaning products.
Avoid these polymeric sand errors by working on a completely dry, sunny day, sweeping thoroughly between applications, and misting lightly rather than soaking the surface during activation.
Mistake 7: Skipping the Bedding Sand Layer Standards
Between the compacted gravel base and the pavers themselves sits a crucial 1-inch layer of coarse bedding sand. Many rushed installations either skip this layer entirely or apply it inconsistently.
Uneven sand depth means some pavers sit higher than others right from the start, creating an immediate tripping hazard that only worsens as the path settles.
Screed the bedding sand using guide rails and a straight board to guarantee a perfectly level, uniform surface before placing a single paver.
Mistake 8: Poor Drainage Planning Near Structures
Walkways installed too close to downspouts, sprinkler heads, or low-lying yard areas often become saturated far more than the rest of the path.
This localized overwatering softens the base in specific spots, causing isolated sinking rather than uniform settling — a telltale sign of one of the more overlooked concrete paver walkway mistakes homeowners make during the planning phase.
Before installation, map out all water sources near your path and consider redirecting downspouts or adjusting sprinkler zones. For broader guidance on smart water management in your yard, the Royal Horticultural Society offers excellent resources on garden drainage and soil health that pair well with hardscaping projects.
Mistake 9: Using Inconsistent Paver Thickness or Quality
Mixing paver batches from different manufacturers, or buying budget pavers with inconsistent thickness, creates subtle height variations across your walkway.
These small discrepancies compound over a long walkway, resulting in a surface that looks rippled even when the base underneath is perfectly compacted and level.
Always purchase pavers from a single batch or lot number, and physically inspect a sample stack for thickness consistency before committing to a bulk order.
Mistake 10: Rushing the Compaction of the Finished Surface
After pavers are placed and sand is applied, a final pass with a plate compactor fitted with a protective pad settles everything into its permanent position.
Skipping this step, or rushing through it without covering every section evenly, leaves pavers loosely seated and vulnerable to shifting the moment foot traffic begins.
This final compaction pass is just as critical as the initial base work, and it’s one of the most commonly rushed concrete paver walkway mistakes among impatient weekend DIYers eager to see the finished result.
How to Repair an Already Sunken or Uneven Garden Path
If your walkway already shows signs of sinking, don’t panic — most sections can be repaired without a full replacement. Carefully lift the affected pavers, scoop out the compromised sand or gravel, and rebuild the base correctly.
Step-by-step repair approach: Remove pavers in the sunken zone, add and compact fresh crushed gravel in thin layers, screed new bedding sand, and reset the pavers with fresh polymeric sand in the joints.
This targeted approach addresses the root cause rather than simply patching the surface, which prevents the same uneven garden path problem from reappearing within a few months.
Just as consistent, careful watering habits keep your garden beds thriving — similar to the principles behind proper bottom watering techniques for healthier indoor plants — consistent moisture control around your hardscaping keeps your walkway’s foundation stable for the long haul.
Final Thoughts on Avoiding Concrete Paver Walkway Mistakes
Building a durable, level paver walkway isn’t about luck — it’s about respecting every layer of the process, from excavation depth to final compaction.
By understanding these ten concrete paver walkway mistakes, prioritizing thorough paver base compaction, avoiding common polymeric sand errors, and planning drainage thoughtfully, you can build a path that stays beautifully level for 20 years or more.
Take your time, invest in quality materials, and your walkway will reward you with lasting curb appeal rather than costly, frustrating repairs down the road.