
Why Flawless Composite Deck Board Installation Starts With Hidden Fasteners
A truly professional composite deck board installation is judged not by the boards themselves, but by what you cannot see.
Exposed screw heads, rusty washers, and uneven fastener patterns instantly cheapen even the most expensive composite decking material.
The good news is that eliminating ugly fasteners is entirely achievable with the right planning, tools, and a handful of insider tricks that professional deck builders rely on every single day.
In this guide, we will walk through six precision hacks that transform a standard composite deck board installation into a seamless, magazine-worthy outdoor space.
Whether you are a weekend DIY warrior or a seasoned contractor, these methods will help you achieve a clean, fastener-free surface that looks as good in year ten as it does on day one.
Before we dive into the hacks, it helps to understand why composite decking behaves differently than wood when it comes to fastening.
Composite boards expand and contract with temperature swings far more noticeably than natural lumber, which means fastening methods must accommodate movement without cracking the board or loosening over time.
This is exactly why the modern approach to deck building leans so heavily on engineered solutions rather than simply driving a screw through the face of every board.
Hack One: Switch to Hidden Fastener Systems From the Very First Board
The single most impactful change you can make to your composite deck board installation is adopting hidden fastener systems instead of top-down screws.
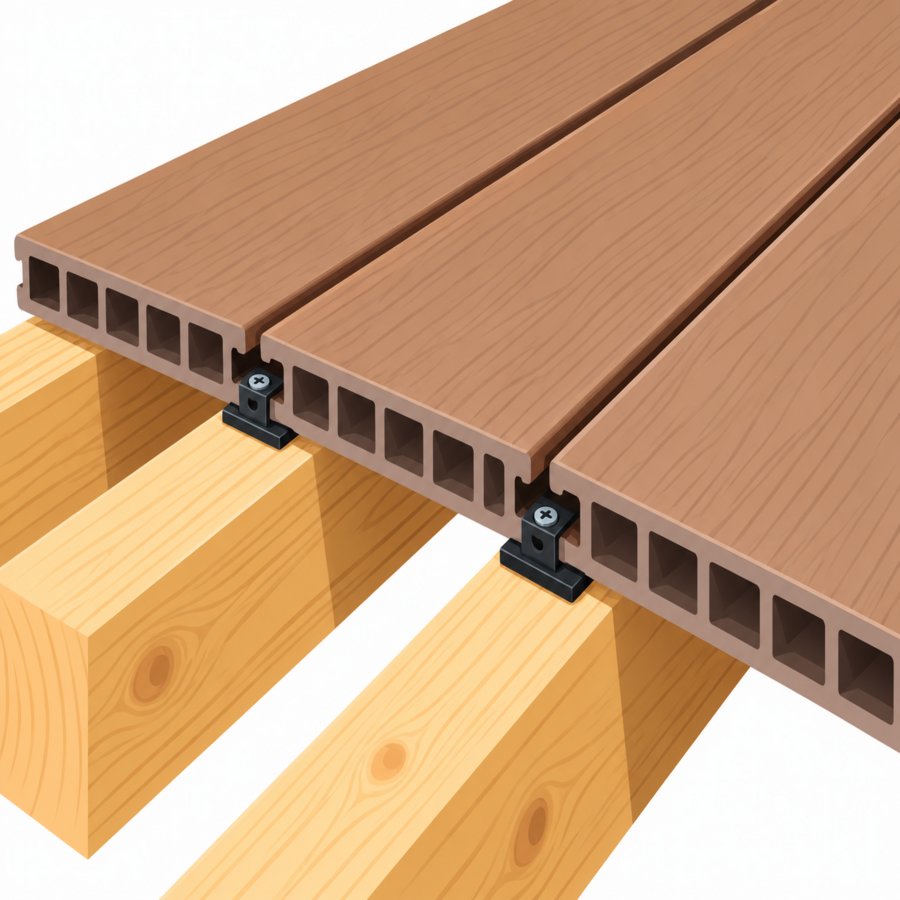
These clips lock into the grooved edge of each board and anchor directly into the joist below, leaving absolutely no visible metal on the walking surface.
Start strong, finish strong. If your very first row of boards is fastened with visible screws because you ran out of clips, the mismatch will be obvious for the life of the deck.
Purchase enough hidden fastener systems for the entire project before you begin, including a 10 percent buffer for mistakes, damaged clips, or future repairs.
Most manufacturers design their clips specifically for their own grooved composite boards, so always confirm compatibility between your decking brand and the fastener brand before purchasing in bulk.
Mixing incompatible systems is one of the most common and costly mistakes in composite deck board installation, often resulting in loose boards or voided warranties.
Hack Two: Respect Deck Joist Spacing Before You Buy a Single Clip
Hidden fastener systems only perform correctly when deck joist spacing matches the manufacturer’s specifications exactly.
Most composite decking brands require 16 inches on center for standard installations, but that number can shrink to 12 inches on center for diagonal patterns or boards installed at an angle.
Measure twice, frame once. Walk your entire substructure with a tape measure before a single board goes down, marking any joists that are out of tolerance.
Incorrect deck joist spacing is the leading cause of boards that bounce, squeak, or sag between fasteners, no matter how good the clips themselves are.
If you are building over an existing frame originally designed for wood decking, double-check the spacing rather than assuming it already complies, since older framing standards were often looser.
According to the USDA forest products guidelines, structural spacing tolerances directly affect long-term load performance, which applies equally to composite systems resting on a wood substructure.
Hack Three: Choose Grooved Composite Boards for a Truly Seamless Surface
Not all composite decking is created equal, and the board profile you select will determine whether hidden fasteners are even possible.
Grooved composite boards feature a channel milled into each long edge specifically designed to accept clip-style hardware, while square-edge boards typically require face-screwing.
The groove is the gateway. Without it, you lose access to almost every hidden fastener system currently on the market.
When shopping, run your fingers along the edge profile in person if possible, or request a sample board shipped directly from the supplier.
A deeper, wider groove generally accepts clips more easily and tolerates minor dimensional variance between production batches, reducing installation frustration later.
If your project also includes interior display elements, you might enjoy browsing these clever floating wood shelf installation techniques for coordinating your indoor and outdoor hardware-free aesthetic.
Hack Four: Master the First and Last Row Transition Points
Even with a perfect hidden fastener system, the first and last boards against a house wall or outer edge present a unique challenge.
These edge boards often lack a groove on one side, forcing installers back toward visible fasteners unless a specific starter or finishing clip is used.
Plan your edges before your middle. Purchase dedicated starter clips and edge trim pieces designed specifically for the ungrooved side of perimeter boards.
Many manufacturers also sell color-matched plugs that fill any unavoidable screw holes along fascia boards, keeping the overall composite deck board installation visually consistent.
For outer edges facing the yard, consider a picture-frame border technique where a contrasting color board conceals the fastening method entirely while adding a custom, upscale look.
This border approach is a favorite among professional designers because it draws the eye toward a deliberate design choice rather than an accidental fastener.
Hack Five: Build in Expansion Gaps That Hidden Fasteners Can Actually Use
Hidden clips are engineered with a small amount of lateral float built into their design, allowing boards to expand and contract without cracking.
If you tighten every clip down as hard as possible, you defeat this engineering and risk buckling boards during the heat of summer.
Snug, not slammed. Drive each fastener until the clip seats firmly against the groove, then stop rather than continuing to crank the screwdriver.
Maintain a consistent 1/8 to 3/16 inch gap between board ends and against any vertical surface like a house wall or post, which allows the whole system to breathe seasonally.
Use a dedicated spacer tool or even a few stacked coins as a quick on-site gauge to keep every gap identical across the entire deck surface.
The Better Homes & Gardens outdoor living experts consistently emphasize that correct expansion planning is what separates a deck that lasts decades from one that warps within a single season.
Hack Six: Pre-Drill Joists and Use a Chalk Line for Flawless Composite Deck Board Installation
Precision composite deck board installation depends heavily on your reference lines, since even a hidden fastener cannot correct a crooked starting point.
Snap a chalk line across your joists at the very first board position, then check it against a second measurement at the far end of the deck to confirm it is perfectly square.
Square lines, straight boards. A deck that is even slightly out of square will visibly fan out by the time you reach the opposite railing.
Pre-drilling pilot holes at each marked joist location prevents clip screws from stripping or splitting, especially on pressure-treated lumber that has fully dried and hardened.
Work in small sections, dry-fitting three or four boards at a time before permanently fastening, so you can catch any drift in deck joist spacing before it compounds across the whole deck.
This methodical approach may feel slower at first, but it consistently produces the cleanest, most professional-looking composite deck board installation with zero visible hardware.
Common Mistakes That Ruin an Otherwise Perfect Deck
Even experienced DIYers occasionally sabotage a beautiful composite deck board installation through a handful of avoidable errors.
Skipping the manufacturer manual. Every brand of grooved composite boards has slightly different clip tolerances, torque settings, and gap recommendations that vary by climate zone.
Using the wrong drill bit or driver. Many hidden fastener systems require a specific star-drive or square-drive bit, and substituting a standard Phillips head often strips the screw head instantly.
Ignoring ventilation underneath the deck. Composite boards still need airflow beneath them to prevent moisture buildup, mold growth, and premature clip corrosion.
Forgetting about end caps on open edges. Cut composite board ends exposed to weather should always receive a matching cap or the picture-frame border treatment to block moisture infiltration.
Avoiding these pitfalls protects both the appearance and structural integrity of your investment for many years of outdoor entertaining.
Final Thoughts on a Fastener-Free Outdoor Living Space
Achieving a flawless, fastener-free deck is less about expensive materials and more about disciplined planning at every stage of the build.
From selecting the right grooved composite boards to confirming accurate deck joist spacing and committing fully to hidden fastener systems, every decision compounds toward a seamless final surface.
Remember that a successful composite deck board installation is really a series of small, precise decisions rather than one single technique.
Take your time with the substructure, invest in quality clips, and your new outdoor living space will reward you with years of barefoot-friendly, snag-free enjoyment.
With these six hacks in your toolkit, you are fully equipped to build a deck that looks custom-crafted by a professional, without a single visible screw in sight.